CONTROL PANEL
In Control Panel you can manage all your information: create default settings for new accounts, add new accounts and new users, manage alerts and so on.
Log in with the user name and password that have been provided to you by Nexetic Support staff.
VENDOR INFORMATION
In section Vendor information you can fill in your information such as contact details, default settings for new accounts and e-mail addressess for sending out alerts.
GENERAL INFORMATION
On General information page you can fill in your contact details. Especially Support e-mail and Support phone are important since they will be shown to the end users in the client program.

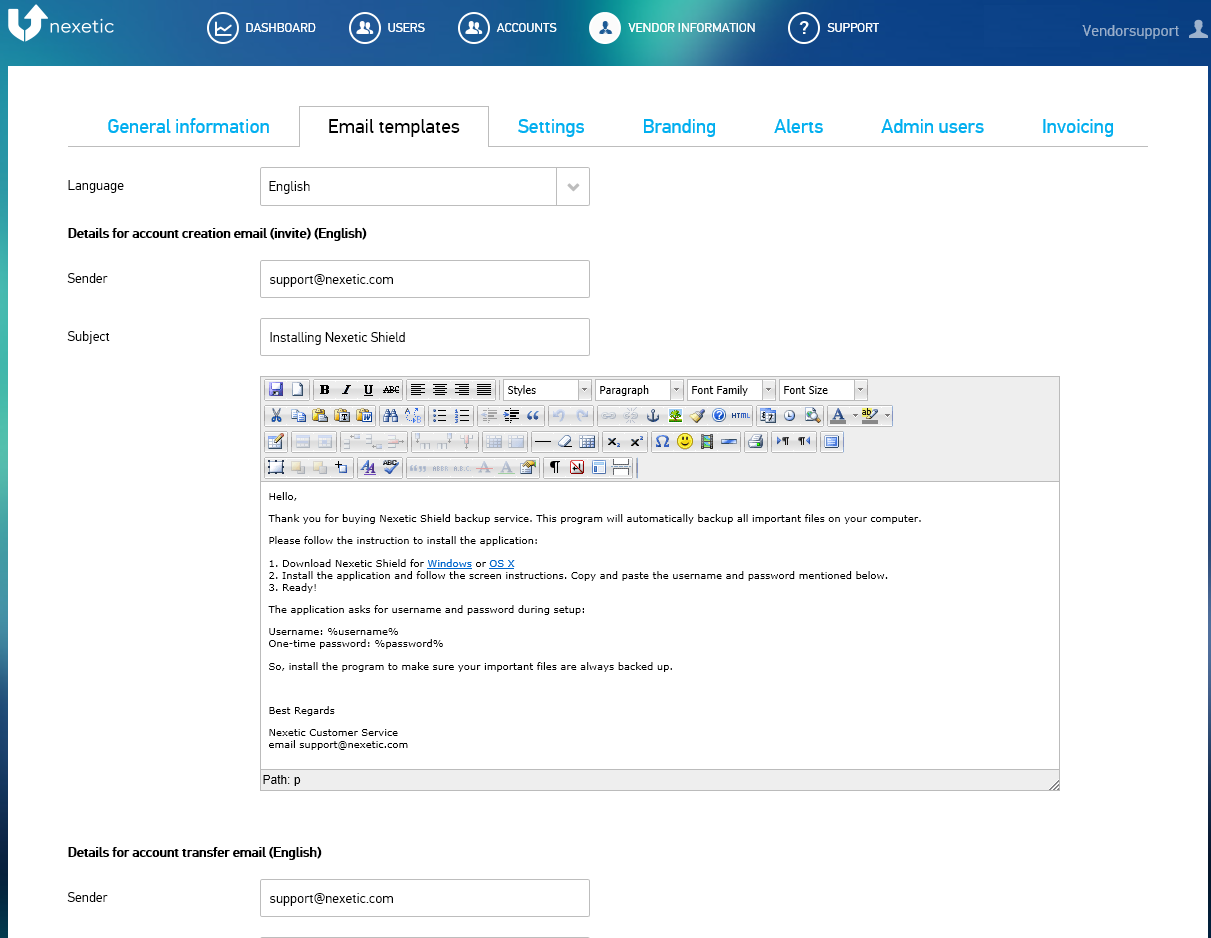
E-MAIL TEMPLATES
On Email templates page you can find templates for the email messages that we send out to end users. There are separate templates for creating, transferring and restoring an account. You have an option to edit the templates - e.g. replace our company contact info with your own. Once finished with editing the details, remember to click Save.
SETTINGS
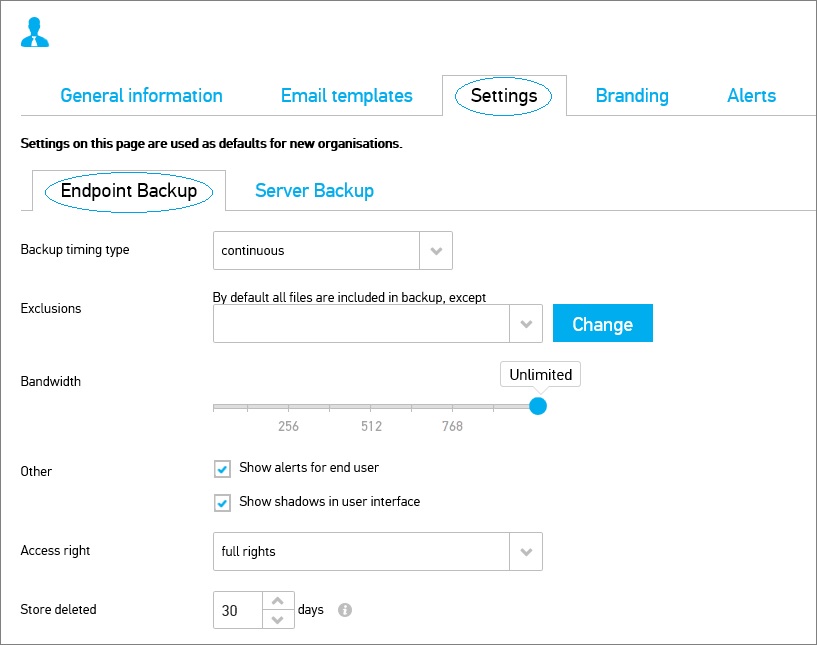
By choosing Settings and Endpoint Backup you can define default settings for all new accounts.
Note that you can always change settings for your customers and even single end users afterwards. Settings can be updated to clients from the control panel.
1) Under Timing there are three different options:
- Turn off - no backups are being made
- Continuous - data is being backed up automatically every few minutes (the recommended option)
- Daily - data will be backed up once a day. You can select time for the daily backup.
2) a) Default data selection: Exclusions approach
By default all the files and folders on end users' computers will be backed up, except for computer's own folders such as System and Program folders, and Windows folder. In Exclusions you can exclude additional folders and content / file types from the backup (external drives, compressed files, binaries etc). Click Change and select them from the drop-down menu.
2) b) Alternative approach: Include folders
If you prefer to pick the individual folder(s) you would like to back up from the users' computers, this is also possible. To for example back up Documents under C drive, do the following:
- In Exclusions, click the Change button
- First excluce C drive. Choose Exclude folders from the drop-down menu and type C:\ in the text box.
- If the users have more drives such as D, you need to exclude them also.
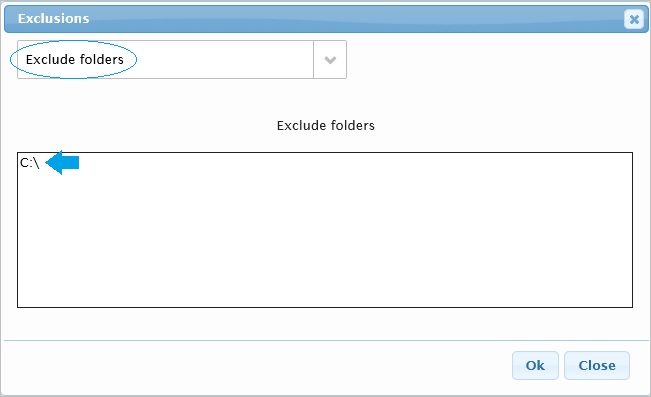
- Next include Documents folder. Choose Include folders from the drop-down menu and type <Documents> in the text box. Alternatively you can also type the complete path.

-> Now only Documents folder will be backed up from the user's C drive.
Please note that only the following folder names can be identified with the <>notation:
<documents>
<desktop>
<public>
<appdata>
<userprofile>
<all_internal_drives
If you would need to have any other folders included or excluded, please contact us.
3) Bandwidth: you can choose the bandwidth that is allowed for the backup service.
- The regular backups will take just a few minutes since only the data that have been changed need to be backed up; also, because the technology adapted by Nexetic is making backing up data very fast. For these reasons it is recommended to use Unlimited bandwidth as a default. If needed, bandwidth can also be adjusted by the end user in client program.
4) Show alerts for end users: you can choose whether you would like to alert end users in case of problems - such as failed backup, disk space running out etc.
5) Access rights: you can define whether end users have rights to change settings in their own client program.
- Full rights: End users can change all basic and advanced settings in their client program.
- Blocked: End users have no right to make any changes to the settings in their client program; only language selection is available.
6) Store deleted: you can choose for how many days the files that were deleted from end users' computers will be kept in the backup. The default value is 30 days.
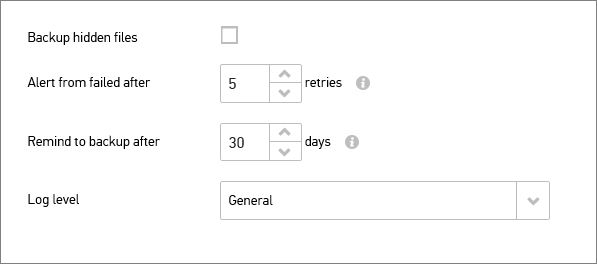
8) You can define whether hidden files need to be backed up by ticking the box Backup hidden files
9) The system will send out an alert in case backing up of data fails - if alerts have been switched on (see section Alerts). In setting Alert from failed after you can choose how many failed retries are allowed until the alert is sent out. Value 5 is normally used as default.
10) If more days than what has been defined in setting Remind to backup after have passed since the last backup, the program will send out an alert via e-mail.
11) Setting Log level allows you to choose either Low, General or Detailed option. General is used by default.
12) After you have finished with adjusting the default settings, remember to click Save. The changes will come into effect only after you have saved them.
BRANDING
If your company is selling Nexetic backup service under your own brand, in Powered By Nexetic or White Label program, you can also customize the layout of control panel.
1) You can replace the Nexetic header i.e. logo in the left upper corner of the page with your own company logo. Click Change at Header logo and upload your company logo from your computer. If you would like to remove your own logo choose Delete to change your company logo back to the Nexetic one.
2) Type the URL of your Company website at Website URL. Clicking the header logo will take users to this address.
3) Favicon refers to the small icon at the beginning of the address bar. It is often the company logo or other relevant symbol. You can change this - just like the header logo. Choose Change at Favicon, and upload the icon from your computer.

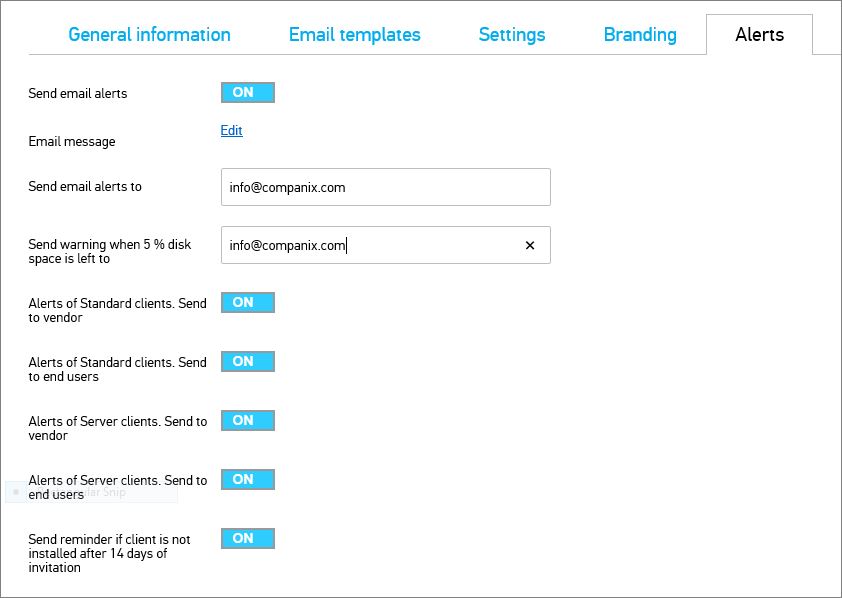
ALARMS
1) If anything unexpected happens with the backup service - such as failed backup or disk space running out - there is an option to send out an alert either / both to the Vendor Support, Company Support if any, and directly to the end users. Please note that alerts can only be sent out in case they have been set on - make sure Send email alerts is set as ON.
2) In Email message field you can edit the email templates that are being sent to the users in case of alarms. The content of the message depends on the alert type.
3) In field Send email alerts to you can fill in the email address(es) for alerts to be sent to - this can be e.g. the email address of your company Support team. You can add several email addresses by separating them by a comma.
4) When the disk space reserved for the account is about to run out, our system sends out an automatic warning. Add the email address of your company Support team in field Send warning when 5% disk space is left to. You can add several email addresses by separating them by a comma.
5) Now you can choose whether the alerts will be sent to
- Vendor of Endpoint users
- Endpoint end users
- Vendor of Server users (Shield Server not yet available)
- Server end users (Shield Server not yet available)
Alerts will be sent accordingly when you choose ON (recommended option) - if you choose OFF there will be no alerts sent to end users or vendors.
6) Each new user will be sent an invitation email containing a user name and password. In case end user has not installed the backup program within 14 days of sending out the invite, the system can alert the user. If you want to take this option in use, set Send remainder if client is not installed after 14 days of invitation as ON.
ADMIN USERS
On Admin users page you can define who should have the rights to make changes to your vendor account and the clients' accounts.
You can view the current users in the drop-down menu Select user.
You can add new admin users by clicking Create new.
- To create a new administrator, fill in the requested fields. It is recommended that user name is exactly the same as user's email address.
- Select the right user rights level:
- Vendor (Reseller's full admin rights)
- Rights to add new "vendor admin" (and lower) level users and change all settings within the vendor account
- Rights to add new users, make license changes and change all client account settings
- Vendor support (Reseller's limited admin rights)
- Rights to add new "vendor support" (and lower) level admin users and change all settings within the vendor account
- Limited rights to change account settings
- Cannot add new users, cannot change license settings
- Account admin (Full admin rights for the Customer)
- Rights to add new "account admin" level admin users
- Rights to change account settings and add new users
- Cannot change license settings
- Account support (Limited admin rights for the Customer - viewing rights only)
- Viewing rights to all account information
- No rights to change any settings
3. Select the Organisation from the drop-down menu
4. Once you have finished, remember to click Save. Login details are automatically sent to the user.
